
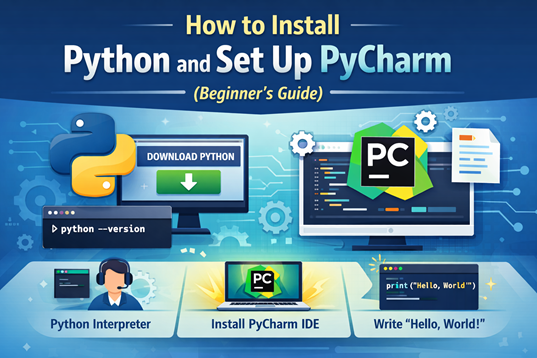
Introduction: Setting Up The Right Environment
If you are starting your Python journey, the very first step is setting up the right environment. Before you can write real Python programs, you need to install Python, understand the Python interpreter, and choose a beginner-friendly tool to write and run your code. In this guide, you will learn how to install Python, set up PyCharm, and write your first famous Python program — Hello, World!
This tutorial is written especially for beginners and is part of Chapter 1: Python Introduction on PyCoderHub.
Why You Need to Install Python Before Learning It
Python is a high-level programming language, but your computer does not automatically understand Python code. To execute Python programs, your system needs the Python interpreter.
Installing Python allows you to:
- Run Python programs on your computer
- Use Python in editors and IDEs like PyCharm
- Start learning Python by writing real code instead of just reading theory
Without installing Python, you can write Python code, but you cannot run or test it.
How to Install Python on Your System
Always download Python from the official source to avoid security risks and outdated versions.
Download and Install Python
Step 1: Visit the Official Python Website
Go to the official Python download page:
https://www.python.org/downloads/
On the download page, you will see several options:
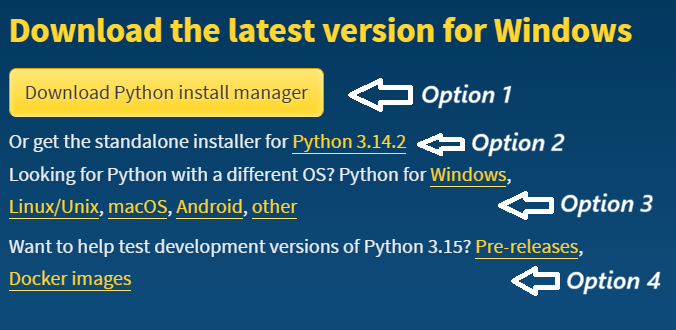
Option 1: Download Python Install Manager
This option automatically downloads, installs, and manages Python versions on your system. It is the best choice for beginners who want a simple and hassle-free Python installation.
Option 2: Get the Standalone Installer for Python 3.14.2
This option downloads the Python 3.14.2 standalone installer, allowing you to manually install Python on your system. This is useful if you prefer direct control over the installation process.
Option 3: Looking for Python for a Different Operating System?
Use this option to download Python for Linux/Unix, macOS, Android, or other operating systems if you are not using Windows.
Option 4: Test Python 3.15 Development Versions
This section is intended for developers who want to test upcoming features in Python 3.15.
Beginners should avoid this option and install the latest stable version (Python 3.14) instead.
Recommendation: If you are using Windows, simply click Option 2 to download the latest stable Python version.
Step 2: Run the Python Installer
After downloading Python, run the installer. The first screen will look like this:
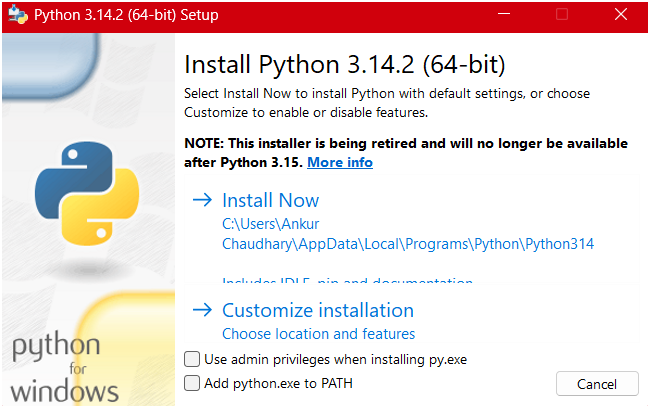
Before clicking Install Now, make sure to select:
- Add python.exe to PATH
- Use admin privileges when installing py.exe (recommended)
Then click Install Now.
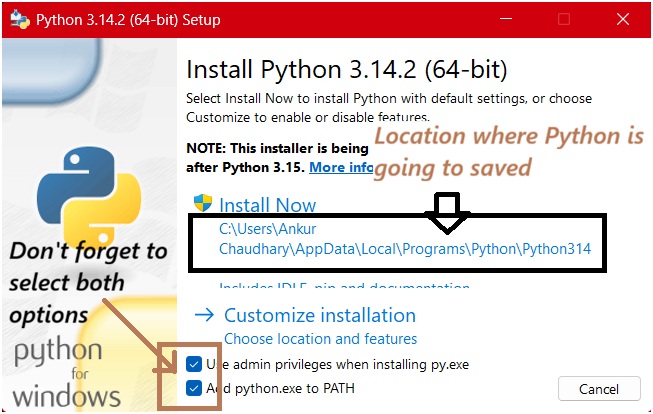
Adding Python to the PATH allows your system to recognize Python commands from any terminal or command prompt. If you skip this step, you may see an error like:
“python is not recognized as an internal or external command.”
Note: Selecting Use admin privileges is recommended but optional. It installs Python system-wide so all user accounts on your computer can access the same Python installation.
Step 3: Complete the Installation
Wait for the setup to finish, then click Close.
Verifying Python Installation
Once the installation is complete, verify that Python is installed correctly and accessible from the command line
For Windows Users:
Open Command Prompt (CMD) or Terminal and type:
python --versionOutput:
Python 3.14.2If Python is installed correctly, it will display the installed version.
If the above command doesn’t work, try:
py --versionOutput:
Python 3.14.2This command also checks the installed Python version on Windows.
For macOS and Linux Users:
On macOS and Linux, both Python 2 and Python 3 may exist on the same system. To check the Python 3 version, use:
python3 --versionOutput:
Python 3.14.2Note:
On some systems, the python command may still point to Python 2.x. Always use python3 to ensure you are running Python 3.
Tutorial Checklist
Now, we hope that by following the above instructions, you have successfully installed Python on your system. Before moving on to the installation of PyCharm, here is a quick tutorial checklist to ensure your Python setup is complete and working correctly.
Python Installation Checklist
- Python is installed successfully
- Running
python --version(orpython3 --versionon macOS/Linux) displays the installed Python version without errors.
- Running
- Python is added to PATH
- You can run Python commands directly from the terminal or Command Prompt without seeing the error “python is not recognized as an internal or external command.”
- Command Prompt / Terminal is working
- You are able to open CMD, PowerShell, or Terminal and execute Python-related commands smoothly.
- Basic Python command works
- Launch the Python interpreter by typing
pythonorpython3and exit usingexit()without issues.
- Launch the Python interpreter by typing
- Latest stable version installed
- You have installed Python 3.14 (stable release), which is recommended for beginners and learning purposes.
- System-wide installation (optional)
- If you selected Use admin privileges, Python is available to all user accounts on your system.
Once all the above checklist items are confirmed, your Python environment is ready for development.
In the next section, we will move on to installing PyCharm and setting up your first Python project.
What Is a Python Interpreter?
Before installing PyCharm, it’s important to understand what a Python interpreter is and why we need an interpreter or an IDE like PyCharm to work with Python.
A Python interpreter is a program that reads Python code line by line and converts it into instructions the computer can understand and execute. Unlike compiled languages (such as C or C++), Python does not require a separate compilation step. Instead, Python code is executed directly by the interpreter.
When you install Python on your system, you are also installing the official Python interpreter, which allows you to run .py files, execute Python commands in the terminal, and interact with Python using the interactive shell.
In simple terms:
Python code cannot run on its own—an interpreter is required to execute it.
Why Do We Need a Python Interpreter?
We need a Python interpreter because computers cannot understand Python syntax directly. The interpreter acts as a bridge between human-readable Python code and machine-level instructions.
Here’s why the Python interpreter is essential:
- Executes Python code line by line
- This makes Python easier to debug and beginner-friendly.
- Handles dynamic typing automatically
- You don’t need to declare variable types explicitly—Python manages this at runtime.
- Provides cross-platform compatibility
- The same Python code can run on Windows, macOS, and Linux as long as a compatible interpreter is installed.
- Enables interactive coding
- You can test code instantly using the Python shell without creating a full program.
Without a Python interpreter installed on your system, Python programs simply cannot run, regardless of the editor or tool you use.
Choosing a Python IDE or Code Editor
While the Python interpreter runs your code, an IDE (Integrated Development Environment) or code editor helps you write, organize, and manage Python programs efficiently.
Popular options include:
- PyCharm (recommended for beginners and professionals)
- Visual Studio Code
- IDLE (comes bundled with Python)
- Sublime Text
Why PyCharm Is a Popular Choice
- Built-in Python interpreter support
- Smart code completion and error detection
- Debugging tools and project management
- Beginner-friendly interface with professional features
Important: PyCharm does not replace the Python interpreter. It uses the Python interpreter installed on your system to run your code.
What Is PyCharm?
PyCharm is a powerful Integrated Development Environment (IDE) designed specifically for Python programming. It provides all the tools you need to write, run, debug, and manage Python code in one place. PyCharm is developed by JetBrains and is widely used by beginners, professionals, and companies worldwide.
Instead of writing Python code in a simple text editor, PyCharm offers a smart coding environment that helps you write clean, error-free Python programs faster. It works on Windows, macOS, and Linux, making it a reliable choice for cross-platform Python development.
In simple terms:
PyCharm makes Python development easier, faster, and more organized.
How PyCharm Uses the Python Interpreter
PyCharm itself does not run Python code directly. Instead, it uses the Python interpreter installed on your system to execute Python programs.
Here’s how it works:
- You write Python code inside PyCharm.
- PyCharm sends that code to the configured Python interpreter.
- The interpreter executes the code and returns the output inside PyCharm.
This means:
- If Python is not installed, PyCharm cannot run Python programs.
- You can configure PyCharm to use different interpreters, such as system Python or virtual environments.
- PyCharm acts as a smart interface, while the interpreter does the actual execution.
PyCharm = Development tool
Python interpreter = Code execution engine
Important Note (Common Beginner Confusion):
Many beginners think PyCharm installs Python automatically because it creates a virtual environment (venv) when a new project is created. In reality, PyCharm does not install Python.When you install Python on your system, the Python interpreter is installed first. PyCharm then creates a virtual environment that uses and points to that existing Python interpreter, acting like a sandbox for your project.
Without Python installed on your system, PyCharm cannot create a working virtual environment or run Python code.
Installing PyCharm (Step-by-Step)
Now that Python is installed and you understand how PyCharm works with the Python interpreter, let’s move on to installing PyCharm step by step and setting it up for your first Python project.
Download and Install PyCharm
Step 1: Visit the Official PyCharm Website
Go to the official Python download page:
https://www.jetbrains.com/pycharm/download/?section=windows
On the download page you will see several options:
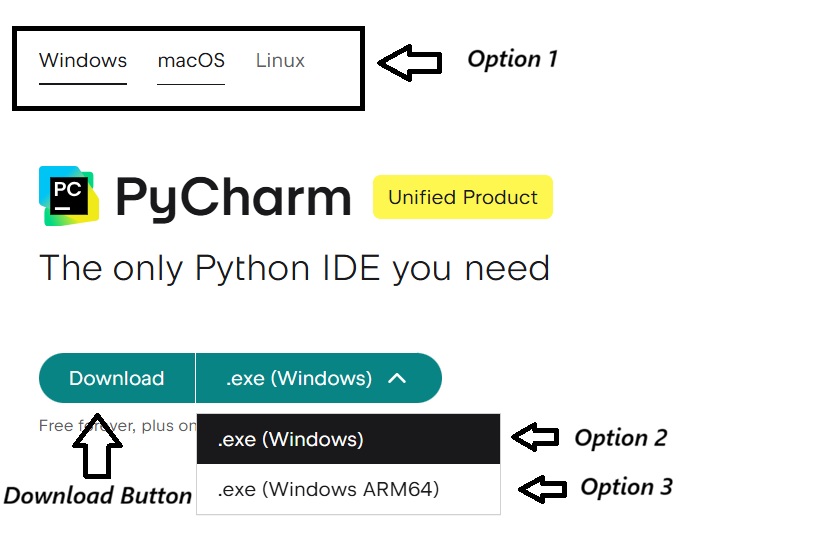
Option 1: Windows/macOS/Linux
This option lets you select your operating system so PyCharm shows the correct installer for your platform. Always choose the OS you are currently using to avoid downloading the wrong installer.
Option 2: .exe (Windows)
This is the standard PyCharm installer for Windows systems running on Intel or AMD processors. Most users should select this option.
Option 3: .exe (Windows ARM64)
This installer is designed for Windows devices with ARM-based processors. Choose this only if your system uses an ARM architecture, such as certain Snapdragon-powered Windows laptops.
Beginner Recommendation:
If you are new to Python or unsure about your system type, select Option 2:.exe (Windows). This is the correct and safest choice for most Windows users.Choose Option 3 (Windows ARM64) only if you know for sure that your device runs on an ARM-based processor. Otherwise, stick with the standard Windows installer.
Step 2: Run the PyCharm Installer
After downloading PyCharm, run the installer. Choose the destination folder where you want to install PyCharm.
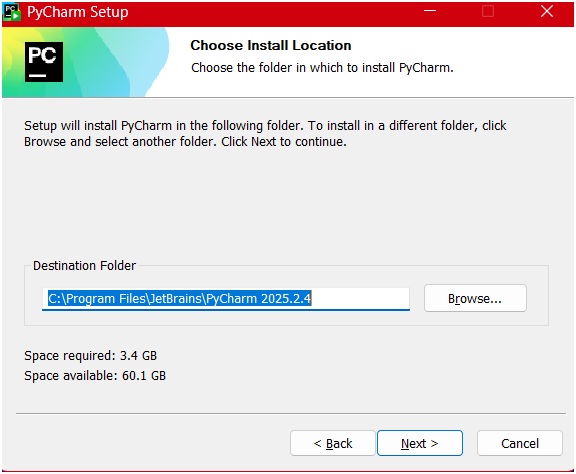
Select all the recommended options during installation to ensure proper configuration.

Step 3: Complete the installation
Wait for the setup to finish, then click Finish to complete the installation.
Explore the PyCharm Interface
Now that PyCharm is installed, let’s take a quick tour of the PyCharm interface so you can understand where everything is and feel comfortable navigating the IDE.
Create a New Project in PyCharm
When you launch PyCharm for the first time, you’ll see a welcome screen like this:
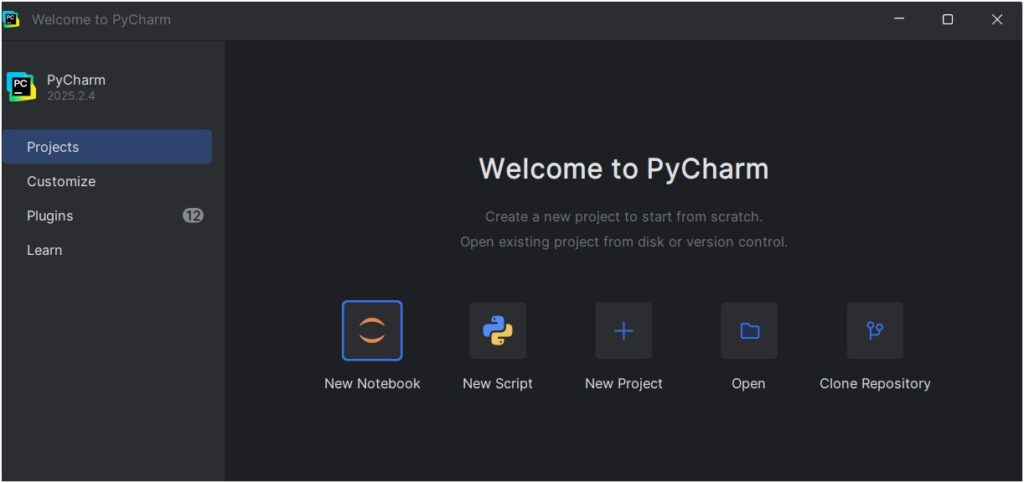
Click on New Project. At this stage, there are two important things to check:
- Project Location – Select the folder where you want to save your Python project.
- Python Interpreter – Make sure the installed Python version is selected by default. If not, manually provide the path to your installed Python interpreter.
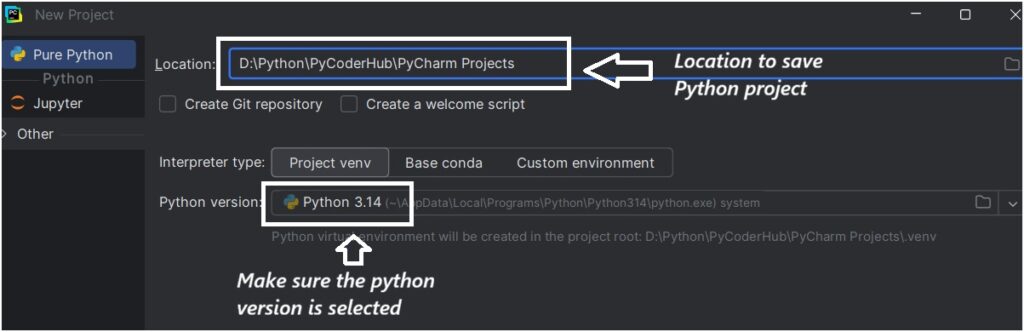
Click Create. Your Python project will now be created successfully.
Create a Python File
To start writing Python code, you need to create a Python file. Right-click on the project directory, select New, and then choose Python File.

Enter a file name of your choice, for example: PyCoderHub.
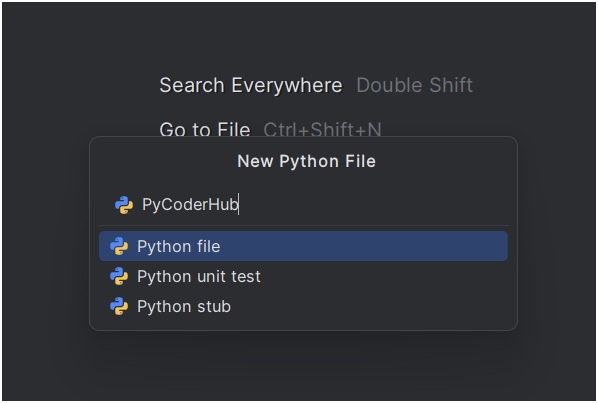
Press Enter after typing the file name. Your Python file is now created, and you are ready to write your first Python program.
Write Your First Python Program
Now that your Python file is ready, it’s time to write your first Python program. In this section, you’ll learn how to write and run a simple Python statement to make sure everything is working correctly.
In the newly created Python file, type the following code:
print("Hello, World!")This is the simplest Python program and is traditionally used to introduce beginners to a new programming language. print() is a built-in Python function. It displays the text inside the quotation marks on the screen.
Run Your Python Program
To run the program in PyCharm:
- Right-click anywhere inside the code editor
- Click Run ‘PyCoderHub’ (or your file name)
You can also use the Run (▶) icon above to execute your code, or you can use the shortcut key
Shift + F10.
Output
Hello, World!Congratulations! You’ve successfully written and executed your first Python program using PyCharm.
Conclusion
In this beginner’s guide, you learned how to download and install Python, understand the role of the Python interpreter, and set up PyCharm as your development environment. You also explored the PyCharm interface, created your first project and Python file, and successfully ran your first Python program. With Python and PyCharm now properly configured on your system, you’re fully ready to begin your Python learning journey. From here, you can move on to writing more complex programs, exploring Python concepts, and building real-world projects with confidence.
Suggested Posts:
1. What is Python? The Ultimate Guide for Beginners (2026)
2. The Evolution and History of Python: From Hobby Project to Global Dominance (1989–2026)
3. Understanding Python Programming Terms: High-Level, Interpreted, Garbage-Collected Explained
4. Python IDLE Explained: Comparison with PyCharm, CMD, and Notepad
5. Python Introduction FAQs: Common Beginner Questions Answered

3 thoughts on “How to Install Python and Set Up PyCharm (Beginner’s Guide)”